Sunday, April 14, 2013

Rainbow Cake

Every Saint Patty's day, my office throws a big party. Normally, I wuss out and buy the requisite green cupcakes, or something similar, but NOT this year. This year, I wanted to kick it up a notch.

When searching online for possible food options, I came across a recipe that I absolutely had to recreate: a rainbow "Leprechaun Trap" cake.

This cake is so colorful, so creative, and perfect for a Saint Patty's day celebration. I knew I was setting myself up for a baking challenge, but was willing to take the chance.

Luckily, my cake turned out great! I didn't know how the rainbow would look until I cut into it, but I was pleasantly surprised. It wasn't an easy cake to make, but I followed the instructions almost exactly and had very good results, so I would recommend this recipe to anyone with a creative flair, patience, and a steady hand!!


With out further ado, the recipe for this marvelous cake (taken from the website Not Martha, with a few alterations by me).

Rainbow Leprechaun Trap Cake

I started by whipping up one box of white cake batter, mixing as directed. I added one teaspon of almond extract to my batter, 'cause that's how I roll.

To form the rainbow in this cake, you have to separate your cake batter, color each section, then pour it into your cake pan one color on top of the next.


Separate the batter into eight bowls and use food coloring to dye the desired colors:
  • 6 ounces – red
  • 5 ounces – orange
  • 4 ounces – yellow
  • 3 ounces – green
  • 2 ounces – blue
  • 1 ounce – purple
  • 1 ounce – to be kept white
  • the rest of the batter, also kept white
To make pouring the batter easier, I filled plastic bags with each color then snipped the corner just before I needed it. I think this gave me a bit more control than scraping it from a bowl, but be aware that it’s difficult to stop the batter once it’s started so get a good hold on the bag before you start — one hand should be on top to squeeze the batter.


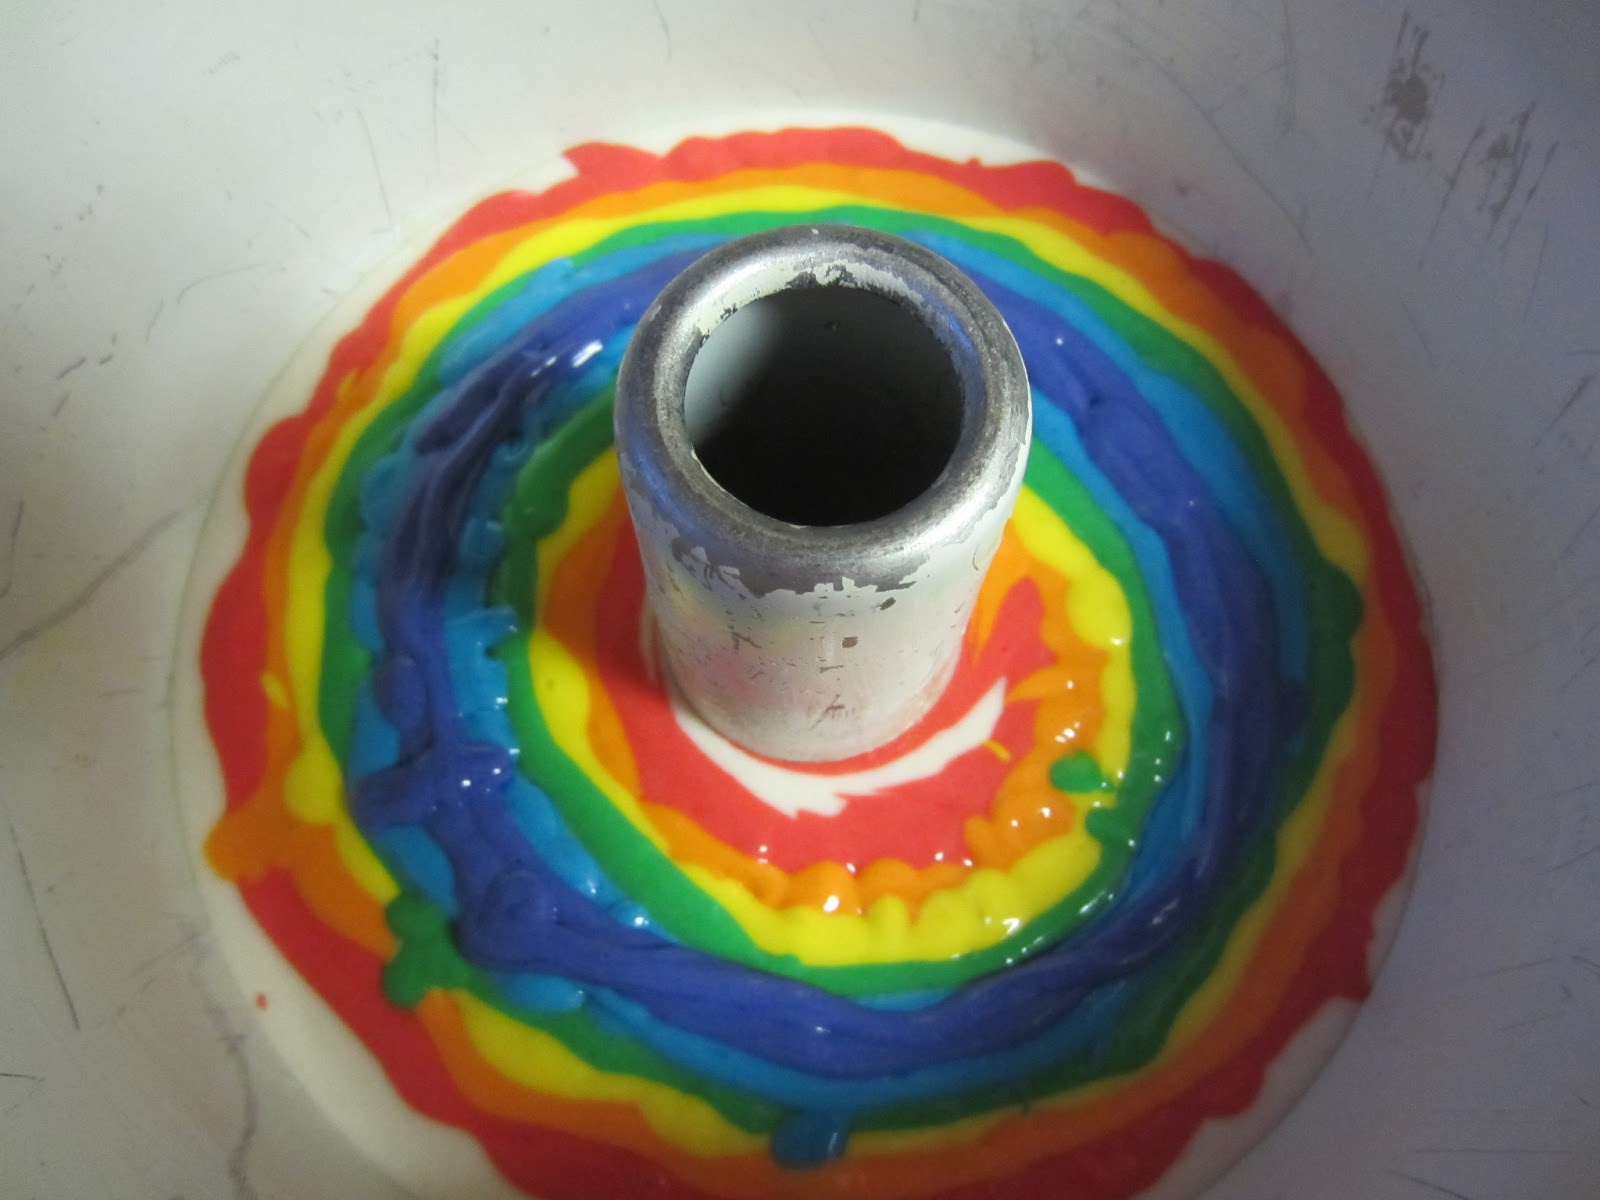
First, pour the larger amount of white batter into the pan. Then pour the red batter in, making it a wide ring of batter. Then pour the orange over that, keeping it inside the red.


Pour in each color, creating narrower and narrower rings. As you go along snip smaller corners off the bags, it will help you control the narrower shape you are trying to make.


Last, pour the remaining ounce of white batter on top

Put the cake in the oven, you might consider baking it at 325 instead of the usual 350 as it will dome a bit less when baked at a lower temperature. I set it at 325 and it turned out okay. As for timing, I can't remember how long mine was in the oven, but follow the box instructions and watch it.


After it's finished baking and has cooled completely, level off what will be the bottom of your cake, this will also help shape the base of the rainbow arch as the batter will curve under itself creating more of a rainbow horseshoe. My cake turned out to be very soft, so a piece of of broke when I was cutting the top off. No worries though, if that happens, you can "glue" it back with icing.


To frost the cake I made a half batch of the Magnolia Bakery buttercream frosting recipe found at MarthaStewart.com. First I did a crumb layer, followed by a few minutes in the freezer.

I used a star decorating tip and make various patterns on the cake. You can get creative here and use different tips, or just smooth the icing on with a knife.  


Ingredients


  • 1 cup (2 sticks) unsalted butter, softened
  • 6 to 8 cups confectioners' sugar
  • 1/2 cup milk
  • 2 teaspoons pure vanilla extract

Directions

  1. In the bowl of an electric mixer fitted with the paddle attachment, combine butter, 4 cups sugar, milk, and vanilla. Beat on medium speed until smooth and creamy, 3 to 5 minutes. Gradually add remaining sugar, 1 cup at a time, beating for about 2 minutes after each addition, until icing reaches desired consistency; you may not need to add all the sugar. Store in an airtight container for up to 3 days.
There you have it! A cake that looks awesome and tastes great (as evidenced by the last lonely piece...)


Tuesday, March 12, 2013


MUSHROOM   STUFFED  MUSHROOMS


I lost this tasty recipe for about 20 years (really) but, recently, found it, again, filed under "fungus." (Joke :) Now that I have your attention, I hope you enjoy this recipe as a great appetizer or addition to dinner.


3 dozen medium sized mushrooms

1/4 cup (1/2 stick) butter (or slightly less, as preferred)

1 tablespoon all purpose flour

1/2 teaspoon salt

1/2 cup light cream

2 teaspoons minced chives (or green onion tops - finely chopped)

1 teaspoon lemon juice


Wipe mushrooms with a damp cloth. Remove stems, reserving caps. Finely chop the stems to make about 2 cups. Sauté the chopped stems in butter in a large skillet. Stir in the flour and salt. Add cream and cook, stirring until thick. (As you add the cream, ensure that the mixture remains thick. Stop adding cream if the mixture seems to be too thin. If the stuffing is too thin, the baked mushroom will lose its form.) Stir in the chives and lemon juice. Stuff caps with the cooked filling. Place the stuffed caps on a cookie sheet. (This may be refrigerated for a few hours before baking.) Bake the stuffed caps in a preheated, 400 degree oven for approximately 8 minutes until the filling begins to bubble and the mushrooms are just crisp-tender.


FIX-AHEAD MASHED POTATO CASSEROLE

This recipe is as popular with my family as Lola Hahn's Chocolate Chocolate Cake.  (Okay, that might be a stretch.) However, it has "served" many for many years...and it's, always, delicious.  (My favorite combination is meat loaf and these potatoes. Savory, hot, comfort food!)  You'll find that this casserole travels well, too.  Take it prebaked or bake until hot when you arrive at your destination. 

Ingredients:

3 pounds potatoes (about 4 large)

1/2 teaspoon salt

2 tablespoons butter

2,  3-ounce packages cream cheese, softened

2/3 cups commercial sour cream

1/4 cup milk

3/4 teaspoon salt

1 tablespoon butter, melted

1/2 teaspoon paprika

Clean the potatoes.  Place potatoes in a saucepan.  Add water to cover and 1/2 teaspoon salt.  Bring to boil; cover, reduce heat to medium, and simmer approximately 25 minutes or until potatoes are tender.  Drain.  Peel potatoes; place in a large mixing bowl, and mash with a potato masher. Add 2 tablespoons butter and the next  4 ingredients, mixing until all ingredients are blended.  Spoon the mixture into a lightly greased 12 X 8 X 2 inch baking dish.  Brush top of mixture with melted butter; sprinkle with paprika.  Bake immediately, or cover and refrigerate.  If refrigerated, let stand at room temperature 30 minutes before baking.  Bake at 350 degrees, uncovered, for 30 minutes or until hot and a little bubbly.  (Yield:  6-8 servings.)

Note:  The above "whole" potato cooking process is per the original recipe.  When I make this dish, I seldom cook the whole potato but choose, instead, to chop the potato into 1 to 1 1/2 inch chunks before boiling.  This reduces the cooking time.  Also, most often, I prefer pealing the potatoes for this recipe.  However, leave the peel on the potatoes, if you want more color and texture in the dish. 

La Madeleine Potato Soup

(I love this soup and know you will, too!)

3 large leeks

1 med-large onion

3 tablespoons butter or vegetable oil

3 ribs celery

6-8 medium potatoes (or a few more, as needed)

dried parsley (2 tablespoons)

garlic powder (2 tablespoons)

dried thyme (1teaspoon +)

Caraway (optional)

Chicken bouillon or broth  (liquid 48 ounces; add more broth as needed)

Chicken bouillon cube (or two +, as needed for flavor)

Black pepper

Salt (to taste at end of cooking time)

Milk (not fat free) – quantity determined by soup consistency you prefer (2-4 cups??)

½ pint half and half 

Leeks:  Trim off the wilted end of the green  stalks and the white bulbs.  Using a knife, carefully slice each leek, lengthwise – almost all the way through.  Using your hands, pry the leek apart at the split and run water into the split area in order to wash any sand from the leeks.  Chop the leeks into small chunks/slices.  Onion:  Dice medium to fine. 

Celery:  Pull the “strings” from the celery.  Chop the celery into fairly small pieces.
 

 Scrub each potato under water until clean.  Chop each potato into ¾ inch to 1 inch pieces. 
(I like to leave the skin on the potato, but you can peal it off, as you prefer.) Put potatoes in medium sized soup pot.  Cover potatoes with water and boil on medium until fork tender.  Drain potatoes.  Set aside.  

Using the same soup pot, combine the butter/oil, leeks, onion, and celery.  On simmer, cook these ingredients until they are soft.  Add the potatoes, parsley, garlic powder, thyme, pepper.  Add enough liquid chicken bouillon to cover the potatoes and vegetables.Simmer these ingredients for approximately 1 hour.  Stir the bottom occasionally.  Add more liquid (chicken broth) to allow the mixture to simmer and cook. 

When the above ingredients are thoroughly cooked/tender, mash the ingredients in the pot.  I leave the potatoes fairly chunky.  You can do this or puree, as you prefer.   

Add milk and the half-and-half to the mixture until it reaches the consistency you like.  (Turn down the heat a little so the mixture won't burn on the bottom of the pan.) Taste for needed salt, pepper for flavor and/or other spice to enhance flavor, as you like it to taste.   (Sometimes, I add a splash of Worchestershire...just because.)


DON'S CORNBREAD 

Each fall, Don and his buddy, Mike Stewart, travel to Arizona for the NASCAR race.  Besides the thrill of the lengthy road trip with Mike (Evidently, Arizona doesn't have airports.;) and the obvious NASCAR fun and challenge with Mike and Mike's parents (Peggy and Stu - the original NASCAR fans!), a favorite trip event is eating...and eating well.  This cornbread recipe is a product of one of Don's NASCAR eating adventures.  If asked, it might be difficult for Don to choose a favorite:  Tony Stewart or this cornbread recipe.  So, Ladies and Gentlemen...start your ovens!  This is a winning recipe!

1 cup butter, softened

1 cup granulated sugar

4 eggs

1 (15 oz) can cream style corn

½ (4 ounce) can chopped green chili peppers, drained

½ cup shredded Monterrey jack cheese

½ cup shredded Cheddar cheese

(You may use 1 cup of the packaged, shredded cheese – like Mexican cheese mix or other)

1 cup all-purpose flour

1 cup yellow cornmeal

4 teaspoons baking powder

¼ teaspoon salt 

Preheat oven to 300 degrees.  Lightly grease a 9X13 inch baking dish or put a tablespoon of butter in a cast iron skillet.  (Put the pan/skillet in the hot oven for about 3-5 minutes before pouring the mix in the pan/skillet.  You want the pan to be hot when you pour the mix in the pan so the cornbread will develop a crust.) 

In a large bowl, beat together butter and sugar.  Beat in eggs one at a time.  Blend in cream corn, chilies, cheeses.   

In a separate bowl, stir together flour, cornmeal, baking  powder, and salt.  Add flour mixture to wet corn mixture.  Stir, but don't make it too smooth.  This should look somewhat thick.  Pour batter into the prepared, hot pan or skillet.

Bake in a preheated oven for one hour or until a toothpick inserted into the center of the pan comes out clean.  The surface will be med/dark golden brown and may be cracked.   

IF USING THE SKILLET, watch out for the hot container. 

IF YOU THINK THE BUTTER QUANTITY IS TOO RICH, USE ½ THE BUTTER AND LESS SUGAR TO TASTE.


BANANA BREAD

(This is a family favorite!)

Cream together:

1 cup granulated sugar

2 eggs

1/2 cup butter - softened

2 teaspoons vanilla

Add:

1 1/2 cup all purpose flour

1 teaspoon baking soda

1/2 teaspoon salt

1 cup mashed, ripe bananas

1/2 cup sour cream

 Blend ingredients thoroughly.  Mixture will be thick and chunky.  (Don't over blend.)

This makes one large loaf or multiple, small loaves and/or muffins. 

Lightly spray PAM in the baking container before filling with the mixture.  Bake the loaf in a preheated 350 degree oven.

Start checking the smaller loaves and muffins at approximately 20 minutes, but they may take take more baking time before done.  The larger loaf (and, possibly, the smaller loaves) will bake for up to 45 to 60 minutes (or longer) - depending on your oven.  After the first batch, you'll know exactly how long to bake this great bread.  A toothpick inserted in the middle of the loaf/muffin should come out slightly damp, but clean.  The baked bread should be golden brown on the top.

This bread freezes well.


ANN HASKOVEC'S CHOCOLATE SHEET (SHEATH) CAKE

(Yes, Don, this is another one of your favorites.  And, you might agree that, while it is not a necessity, a bowl of homemade vanilla ice cream is a natural addition to Mom's tasty cake.  Just sayin'.)

Cake ingredients:
Thoroughly mix the flour and sugar together in a medium bowl. Set aside.

2 cups all-purpose flour
2 cups granulated sugar
Combine the 4 ingredients below in a medium saucepan.  Bring to a rapid boil, stir, then pour the hot mixture into the flour/sugar mixture.  Stir (or beat) until all ingredients are incorporated and the mix is smooth. 
1 stick butter
1/2 cup Crisco
4 tablespoons dry cocoa powder
1 cup cold coffee 
(Don't love coffee? Don't let this ingredient distract you since the coffee flavor is barely discernible in the recipe  unless you make an extra-strong cup.)
Additional ingredients:

Pour the buttermilk into a bowl or measuring cup.  Thoroughly stir in the baking soda.  Allow about 5 minutes for the mixture to increase in volume. 
1/2 cup buttermilk
1 teaspoon baking soda
Add:
1-2 teaspoons vanilla
2 eggs - beaten well
Pour the additional ingredients into the flour/sugar/chocolate blended ingredients.  Stir (mix) thoroughly.  Pour this mixture into a lightly greased (I use PAM.) baking pan or dish - approximately 16X11 in size.  Bake at 350 degrees in a preheated oven for approximately 20 minutes or until a toothpick comes out clean.  
Icing:
1 stick butter - softened
4 tablespoons dry cocoa powder
6 tablespoons milk
Put these three ingredients (above) in a saucepan  and bring to a boil, stirring constantly.  Remove the pan from the heat and add:
1 box powdered sugar
1-2 teaspoons vanilla
1 copped finely chopped nuts (like pecans or walnuts) - optional
Beat the above icing ingredients together until smooth.
Carefully spread the icing on the cake while the cake is hot.


Wow!  Thanks, Mom!


BROCCOLI SALAD

While you may not love broccoli, this dish makes you believe that you do...love broccoli.  Thanks to friend Kim Yetter for sharing this great salad recipe!


Salad ingredients: 

1 head broccoli (cut into bite size pieces – tops only) 

1 cup white or golden raisins 

1 cup crushed CRISP bacon 

½ cup sunflower nuts/seeds 

½ cup red onion – chopped fine 

Dressing: 

1 cup mayonnaise (regular or low-fat version)

 2 tablespoons vinegar 

¼ cup sugar


Mix the three ingredients thoroughly, and incorporate the mixture with the salad ingredients. 

 
Refrigerate salad after preparing and before serving.

Sweet Potato Casserole 

Don and I received this recipe as a wedding gift. Since then, this casserole has appeared (and disappeared) at many family Thanksgiving feasts.  I hope you enjoy it!

 
3 cups sweet potatoes (drained, peeled, and mashed)

¼ to ½ cup milk (can be evaporated)

        Use the quantity milk to the consistency you prefer.  It should look like thick,  
        mashed potatoes.

2 eggs, beaten, then added to mix above

½ teaspoon nutmeg

½ to 1 teaspoon cinnamon

½ stick butter – melted

1 cup white/granulated sugar

1 teaspoon vanilla


Thoroughly mix all above ingredients together. 

Put in greased (or use Pam) casserole (9X13).

Bake at 400 degrees for 25 minutes. 

Topping: 

1 cup crushed cornflakes

½ cup brown sugar

½ cup pecans or walnuts

1/4 to 1/3 cup butter – softened or melted

(You can use up to ½ cup butter.  I think this is too much, though, so I cut it to 1/4 cup, as noted.) 

Thoroughly mix these four ingredients together. It should look somewhat chunky.
 

Carefully spread this mixture on top of the hot casserole.  Continue baking for another 15 minutes or until the top is golden and looks somewhat bubbly.


TACO SOUP
 (This is a family favorite!)
 
Ingredients:
 1 - 2 pounds ground hamburger (brown and drain)
1 onion – finely chopped
1 can corn
1 can kidney beans (drain)
1 can black beans (drain and rinse)
1 can pinto beans
1 large can stewed tomatoes (or finely diced)
1-2 cans Rotel Tomatoes
1 large can tomato sauce
1 can water
1-1 ½ packages dry Hidden Valley Ranch Mix (original)
1 – 2 packages Taco Seasoning Mix
2 tablespoons cumin
Jalapenos (seeded and diced fine – as you prefer)
 
After browning hamburger, drain it and return it to the soup pot.  Add the onion and simmer/cook until the onion is tender.  Add the other ingredients.  Mix all together.  Add more ingredients, as you prefer:
  • finely diced tomatoes
  • Rotel tomatoes
  • Jalapeño (can used the pickled jalapenos in the jar – chopped fine)
  • Additional liquid, as needed, per your preference. 
Cooked, cubed chicken may be substituted for the ground meat.
 
Simmer approximately 30 minutes or more before serving.
 
Delicious!


STUFFED PASTA SHELLS                               

(delicious, quick and easy!)

 
Ingredients:

Lean ground beef and/or lean ground turkey (2 pounds)

JUMBO pasta sea shells (Barilla or other brand)

French's Durkee Dried Onions (1 large can)

Shredded Monterey Jack cheese (1 – 8 oz. bag)

-         Can use mixed cheddar, Mexican cheese…whatever you like

Mild Salsa (large jar of 24 oz. or more)

-         La Victoria brand is recommended.  I used Walmart store brand, and it was good.


Directions: 

Preheat oven to 350 degrees.

Boil Jumbo pasta shells. Do not overcook.  Drain.  Set aside.

Meanwhile, cook ground meat, drain fat.

Mix together the salsa, cheese, and onions.  Set aside. (See option below.)

Add “half” of the next 3 ingredients to the meat (onions, cheese, salsa).

Mix together.

While pasta shells are still hot, stuff each shell FULL with meat mixture.

Place these in a large baking dish that has been lightly sprayed with PAM.

When you have fully stuffed all the shells and there is no meat mixture left, pour remaining salsa, onions, and cheese mixture over the top of shells. 

Bake at 350 degrees for approx. 20 minutes or until cheese and onions have browned.
 
Options:

Reserve a little cheese and onion instead of mixing all with the salsa. If you do that, after you put the “top” layer of the salsa on the stuffed shells, you can sprinkle some extra cheese and, then, onions on top of that.

I used more than a 24 ounce jar of salsa – probably about 28-30 ounces total. 

I used 1 pound each of lean hamburger and ground turkey. 

Instead of preparing one, huge casserole (This recipe makes a lot.), I prepared enough for two meals (good leftovers) and, using medium sized aluminum bread pans, put about 8 stuffed shells and topping in each of two pans.  These were frozen for future meals. 

CHOCOLATE-RASPBERRY TORTE

Makes one 9-inch cake, serving 12 to 16

This is not my original recipe, but I'll claim this as a decadent dessert discovery!  It's a gorgeous and delicious torte.  (The recipe looks difficult.  Actually, this is a relatively easy cake to assembly.  And, it is so worth it!  Enjoy!  Cynthia)

Recommendation:  Use either Callebaut Intense Dark L-60-40NV or Ghirardelli Bittersweet Chocolate Baking Bar, but any high-quality bittersweet or semisweet chocolate will work. If you’re refrigerating the cake for more than 1 hour in step 6, let it stand at room temperature for about 30 minutes before serving.

Ingredients
Cake and Filling
  • 8 ounces bittersweet chocolate , chopped fine (see note)
  • 12 tablespoons (1 1/2 sticks) unsalted butter , cut into 1/2-inch pieces
  • 2 teaspoons vanilla extract
  • 1/4 teaspoon instant espresso powder
  • 1 3/4 cups (about 7 ounces) sliced almonds , lightly toasted
  • 1/4 cup unbleached all-purpose flour (1 1/4 ounces)
  • 1/2 teaspoon table salt
  • 5 large eggs
  • 3/4 cup (5 1/4 ounces) sugar
  • 1/2 cup fresh raspberries , plus 16 individual berries for garnishing cake
  • 1/4 cup seedless raspberry jam
Chocolate Ganache Glaze
  • 5 ounces bittersweet chocolate , chopped fine (see note)
  • 1/2 cup plus 1 tablespoon heavy cream
Instructions
FOR THE CAKE:
Adjust oven rack to middle position and heat oven to 325 degrees. Line bottom of two 9-inch-wide by 2-inch-high round cake pans with parchment paper. Melt chocolate and butter in large heatproof bowl set over saucepan filled with 1 inch simmering water, stirring occasionally until smooth. Remove from heat and cool to room temperature, about 30 minutes. Stir in vanilla and espresso powder.
Process 3/4 cup almonds in food processor until coarsely chopped, six to eight 1-second pulses; set aside to garnish cake. Process remaining cup almonds until very finely ground, about 45 seconds. Add flour and salt and continue to process until combined, about 15 seconds. Transfer almond-flour mixture to medium bowl. Process eggs in now-empty food processor until lightened in color and almost doubled in volume, about 3 minutes. With processor running, slowly add sugar until thoroughly combined, about 15 seconds. Using whisk, gently fold egg mixture into chocolate mixture until some streaks of egg remain. Sprinkle half almond-flour mixture over chocolate-egg mixture and gently whisk until just combined. Sprinkle in remaining almond-flour mixture and gently whisk until just combined.
Divide batter between cake pans and smooth with rubber spatula. Bake until center is firm and toothpick inserted into center comes out with few moist crumbs attached, 14 to 16 minutes. Transfer cakes to wire rack and cool completely in pan, about 30 minutes. Run paring knife around sides of cakes to loosen. Invert cakes onto cardboard rounds cut same size as diameter of cake and remove parchment paper. Using wire rack, reinvert 1 cake so top side faces up; slide back onto cardboard round.
TO ASSEMBLE TORTE: Place ½ cup raspberries in medium bowl and coarsely mash with fork. Stir in raspberry jam until just combined. Spread raspberry mixture onto cake layer that is top side up. Top with second cake layer, leaving it bottom side up. Transfer assembled cake, still on cardboard round, to wire rack set in rimmed baking sheet.
FOR THE GLAZE: Melt chocolate and cream in medium heatproof bowl set over saucepan filled with 1 inch simmering water, stirring occasionally until smooth. Remove from heat and gently whisk until very smooth. Pour glaze onto center of assembled cake. Use offset spatula to spread glaze evenly over top of cake, letting it flow down sides. Spread glaze along sides of cake to coat evenly.
Using fine-mesh strainer, sift reserved almonds to remove any fine bits. Holding bottom of cake on cardboard round with 1 hand, gently press sifted almonds onto cake sides with other hand. Arrange raspberries around circumference. Refrigerate cake, still on rack, until glaze is set, at least 1 hour and up to 24 hours. Transfer cake to serving platter, slice, and serve.
Technique
·         Assembling Chocolate-Raspberry Torte
This approach creates a torte with a perfectly flat bottom and top.

1. INVERT
Run paring knife around sides of cake and invert layers onto cardboard rounds.

2. REINVERT ONE
Using wire rack, reinvert one cake so top faces up; slide back onto cardboard round.

3. TOP WITH FILLING
Spread raspberry filling over cake layer with its top side facing up.

4. TOP WITH CAKE
Top with second cake, leaving bottom facing up.

5. GLAZE
Use offset spatula to evenly spread ganache over top and sides.

Technique
 
·         Torte Reform

We’re all for restraint—but not when it comes to dessert. Here’s how we packed more chocolate flavor and fruitiness into our torte than in the classic European model.

  • SWAP SPONGE FOR FLOURLESS
    A flourless cake holds twice the chocolate of the usual sponge-cake base.
  • ADD GROUND ALMONDS
    Ground toasted almonds lend complexity to the rich cake.
  • FILL WITH TWO KINDS OF BERRIES
    Fresh raspberries and raspberry jam make for a bright-tasting filling.
  • GLAZE WITH POTENT GANACHE
    Use chocolate and cream only. Skip corn syrup and sugar, which dilute flavor.


Sunday, February 17, 2013

LOLA HAHN'S CHOCOLATE "CHOCOLATE" CAKE

Don loves chocolate cake.  I love Don.  So, for years, I searched for a scrumptious chocolate cake recipe.  About 25 years ago, at a family reunion in Bryan, Texas, Don spied a huge slice of frosting-covered chocolate cake on the dessert table.  Evidently, this was the stuff of his childhood memories - a dessert he first tasted when he was a little fella - a chocolate cake made by Mrs. Lola Hahn. Quickly, I decided that, since her cake was at the reunion, Mrs. Hahn was somewhere in that room, anxious to share her recipe with me.   And, sure enough, she was!  I introduced myself, told her of my husband's love for her cake, and asked if she would mail the recipe to me. Ms. Hahn quickly responded, "Oh, Honey. No need to mail it. Grab a napkin and a pen.  I know this recipe by heart."  Since that time, Ms. Lola Hahn's cake is our family's favorite, particularly for our birthdays.    In honor of Ms. Hahn, and the marvel of chocolate, we named her cake Lola Hahn's Chocolate "Chocolate" Cake.  It's a moist, rich, extra-chocolaty delight. Enjoy!


CAKE:
For a BIG cake (3 or 4 larger layers), increase the following ingredients to 1 1/2 recipe.

Step #1
In a large bowl, thoroughly mix together the following ingredients:
2 cups all-purpose flour
2 cups granulated sugar
1 teaspoon salt

Step #2
In a medium saucepan, combine the following:
1 cup water
2 sticks (1 cup) butter (The 3 butter sticks in the picture indicate the 1 1/2 recipe quantity.)
3 tablespoons cocoa powder (like Hersey's)


Over low-medium heat, stir these ingredients until all are combined and slightly boiling.  Slowly pour the hot mixture (ingredients from Step #2) into the dry ingredients (Step #1).  Using a mixer, thoroughly combine the dry and wet ingredients.


Step #3
2 eggs (slightly beaten)
1 teaspoon baking soda
1/2 cup buttermilk
2  teaspoons vanilla

Pour the buttermilk into a small mixing bowl.  Add the baking soda, stirring it into the milk.  Allow this to sit for approximately 2-5 minutes, until the soda and buttermilk have increased in volume.  Thoroughly stir in the vanilla and eggs.  Next, thoroughly, mix the Step #3 wet ingredients into the previously combined ingredients from Step # 1 and #2. 

Grease and lightly flour three, round cake pans.  (You may use Pam and the flour dusting.)
Preheat oven to 350 degrees.  Evenly distribute the cake mixture into the 3 pans. 
Bake in the preheated oven for 20 minutes (or slightly more, depending on your oven).  A toothpick inserted in the middle of a layer should come out clean.  Cool completely before icing the cake.

photo.JPGphoto.JPG


ICING:
(If you are making the bigger version, increase the ingredients below to 1 1/2 quantity.)

1 stick butter - softened
3 tablespoons cocoa powder
2 teaspoons vanilla
1 box (or more) powdered sugar
Milk to make spreadable. 
(Blend all together thoroughly - adding additional powdered sugar and/or more milk to reach a fairly thick, but spreadable, icing.)

Select a cake plate.  Work with one layer at a time, adding icing between each layer.  Ice the top and sides until the icing covers the entire cake.  Leave the iced cake uncovered for, approximately, one  hour before serving.  This step allows the icing to set.


Sunday, January 27, 2013

Cheese Enchiladas

My mom gave me this recipe a couple of years ago, and it's a wonderful dish when you're craving some cheesy, gooey Mexican food.

Cheese Enchiladas

by Cynthia McCallum

Step one:
4 dried Ancho peppers - seeded and stemmed
4 dried New Mexico or Guajilla peppers - seeded and stemmed
3 cups chicken stock
1/2 white onion
3 cloves garlic

Add the above ingredients to a stock pot and simmer until peppers are soft and pliable. Cool slightly. Place all ingredients in a blender and mix until smooth. Add salt and pepper to taste.


Step two:
1/4 cup whipping cream

Add cream to the blender mixture and thoroughly mix all together.


Step three:

Prepare a casserole dish by lightly spraying the bottom and sides with non-stick cooking spray (Pam) or applying Crisco to the bottom and sides. Preheat oven to 400 degrees.


Step four:

Kraft Mexican cheese (look for pre-grated cheese - if you cannot find the Mexican cheese, use Monterrey Jack and Cheddar cheeses)
Corn tortillas (the thinner "Mission" brand works well)

Pour approximately 1 tablespoon oil into a skillet. Heat (but do not get this so hot that it smokes). "Fry" each corn tortilla in oil 2 to 3 seconds. Remove from the oil/skillet. Using paper towels, pat the excess oil from the tortilla.

Place a generous portion of cheese inside each fried tortilla. Roll the tortilla and place it in the casserole dish - seam side on the bottom.

Step five:

 When you have filled the casserole dish, pour the prepared sauce over the tortillas. Sprinkle the top with additional grated cheese, using the quantity you prefer. Bake the enchiladas for approximately 10-12 minutes, or until the dish is bubbly and the cheese has melted.


Finished product: Delicious cheese heaven!

Yee-haa! Let's get started. I'm hungry.

I am looking forward to seeing all of the good food ideas.

Wednesday, January 23, 2013

Christmas Tree Cookies

This is probably my all-time favorite cookie recipe, and one that is very dear to my heart. My Aunt Janice made these cookies for many years and passed along the tradition to me when I was a young girl. Ever since then, I've been making these yummy cookies for family, friends, and myself (don't judge, they're hard to resist!). The orange flavored icing is a real treat for the taste buds. These cookies can be made in any shape and with any color of icing, so they're perfect for all occasions. Enjoy!

Christmas Tree Cookies 
by Victoria Fisher


Sugar Cookies
1 cup butter
1 cup sugar
2 eggs
1 tbsp. milk
1 tsp. vanilla
3 cups flour, sifted
3 tsp. baking powder

Cream butter. Add sugar gradually. Add eggs, milk, and vanilla. Cream well. Add flour sifted with baking powder. Mix well. Chill dough for at least 10 minutes (or longer to make dough stiff enough to work with).

Roll out dough on floured surface (I use flour liberally to make sure nothing sticks). Cut into tree shapes or any other shape you want. Place on greased baking sheet. Bake at 350 degrees for 10 to 15 minutes until very light golden color.

1 batch makes about 3-4 dozen cookies.

Orange Icing
            ½ cup Crisco (butter flavor)
            1 box of powdered sugar (4 cups)
            ¼ cup of hot water
            1 teaspoon orange extract

Mix all ingredients together on slow speed with electric mixer. Do not beat. You can add more or less powdered sugar or water in order to reach a good thickness. Spoon icing into separate bowls and dye with food coloring (for the Christmas tree shapes, I use green for the tree and pink for the stars). Use decorating bags and tips to ice the cookies, or spread icing with a knife. Be creative!